Quantcast
Channel: C# Archives - Blog Cybele Software, Inc.
Viewing all 101 articles
Browse latest View live

Publish AutoCAD to the web with Thinfinity Remote Workspace

$
0
0
How to publish AutoCAD to the web with Thinfinity Remote Workspace

AutoCAD is one of the most used programs by architects,  industrial designers and students in order to design their projects. At the same time, its license costs make it an expensive option for many educational programs. Learn how you can solve this by publishing it as a RemoteApp with Thinfinity® Remote Workspace.

AutoCAD is a software widely used by architects, engineers, industrial designers and students. Although there is a Web App version of AutoCAD, it does not have all the functionalities of the Desktop version. At the same time, due to its high licenses costs, it may be too expensive to offer it to large number of professors and students.

This challenge -as complex as it seems- can be solved by publishing a RemoteApp with Thinfinity Remote Workspace, our all-in-one solution for application and desktop delivery. With Thinfinity Remote Workspace, you can publish AutoCAD to the web in just a few minutes.

What is a RemoteApp?

RemoteApp is a feature of Microsoft’s Remote Desktop Services that allows individual programs to run remotely using a Remote Desktop Client. Instead of accessing the entire remote desktop, RemoteApp allows users to see and interact with just the application as if they were running on the end-user’s device.

You don’t need to have any programming skills or make any modification to the Windows application source code to accomplish it.

How to publish a RemoteApp with Thinfinity Remote Workspace?

Thinfinity Remote Workspace is the first integrated solution to access applications, desktops, data, from a unified portal. With Thinfinity Remote Workspace, you can enable remote access to ALL your apps, desktops, and files on any device.

Installing it for the first time is pretty simple. There are just a few items you have to take into account. You can check the Thinfinity Remote Workspace’s installation steps here.

Once you complete the installation process, open the Thinfinity® Configuration Manager:


publish premiere pro on web 13


Click on the ‘Access Profiles’ tab, and press ‘Add’. For this guide, we’ll be creating an ‘RDP’ connection:


publish premiere pro on web 11


Configure the Access Profile with a ‘Name’, then on ‘Computer’ enter the IP Address or domain name of the server, and on ‘Credentials’ enter the Windows credentials to authenticate to said server:


Web AutoCAD with Thinfinity Remote Workspace 1


For testing purposes, check the ‘Allow anonymous access’ option:


Web AutoCAD with Thinfinity Remote Workspace 2


Under the ‘Program’ tab, choose the ‘Execute as RemoteApp’ option.

Then, point both the ‘Program path and the filename’ and ‘Start in the following folder’ fields to the executable’s directory and its root folder, respectively.

You can also pass arguments to your application in the “Arguments” field:


Web AutoCAD with Thinfinity Remote Workspace 3


For testing purposes, mark the check-box for ‘Allow anonymous access’ under the ‘Authentication’ tab:


publish premiere pro on web 7


Press ‘Apply’:


Web AutoCAD with Thinfinity Remote Workspace 4


You can open the published application by going to http://127.0.0.1:Port and clicking on the newly created Profile:


Web AutoCAD with Thinfinity Remote Workspace 5


You can now use  AutoCAD on a browser via the RemoteApp functionality for Thinfinity Remote Workspace!


Web AutoCAD with Thinfinity Remote Workspace 6

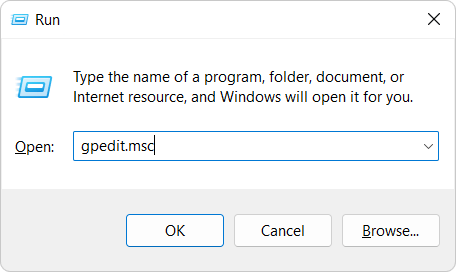
If you get an access denied error, you would need to enable a group policy to allow unlisted programs to be started. To this end, open the ‘Group Policy Editor’ by going to ‘Start > Run > gpedit.msc’:


publish premiere pro on web 9


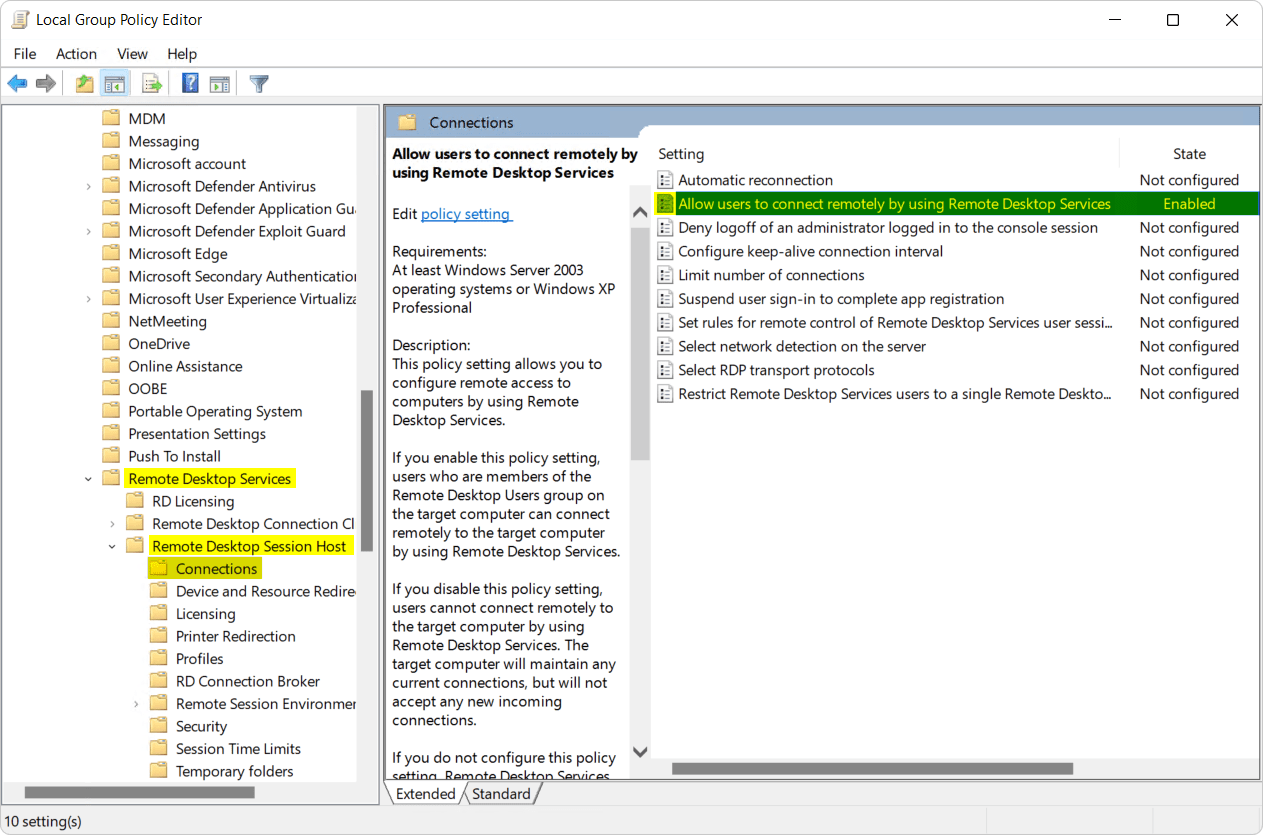
On the ‘Group Policy Editor’ navigate to:
‘Computer Configuration > Administrative Templates > Windows Components > Remote Desktop Services > Remote Desktop Session Host > Connections > Allow users to connect remotely by using Remote Desktop Services’


publish premiere pro on web 8


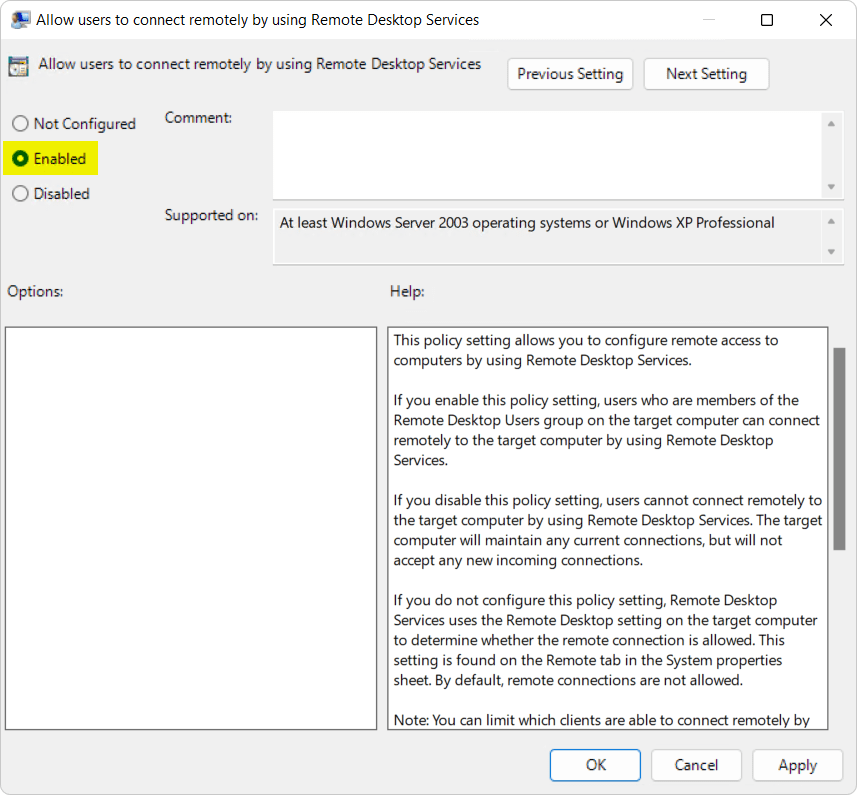
Double click on this policy and then click on the check-box next to ‘Enabled’:


publish premiere pro on web 6


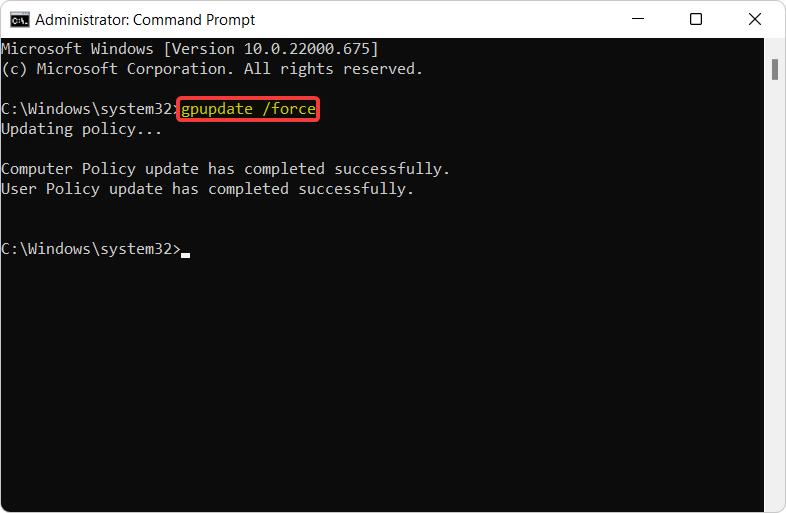
Afterwards, you’ll have to update the group policies. In order to do this, call ‘gpupdate /force’ from a ‘Command Prompt’ window elevated as an Administrator:


publish premiere pro on web 3


If you want to give your users quick access to Adobe AutoCAD, you can create a desktop shortcut to the URL of Remote Workspace with the Virtual Path of the application. Here’s an example:


Web AutoCAD with Thinfinity Remote Workspace 7

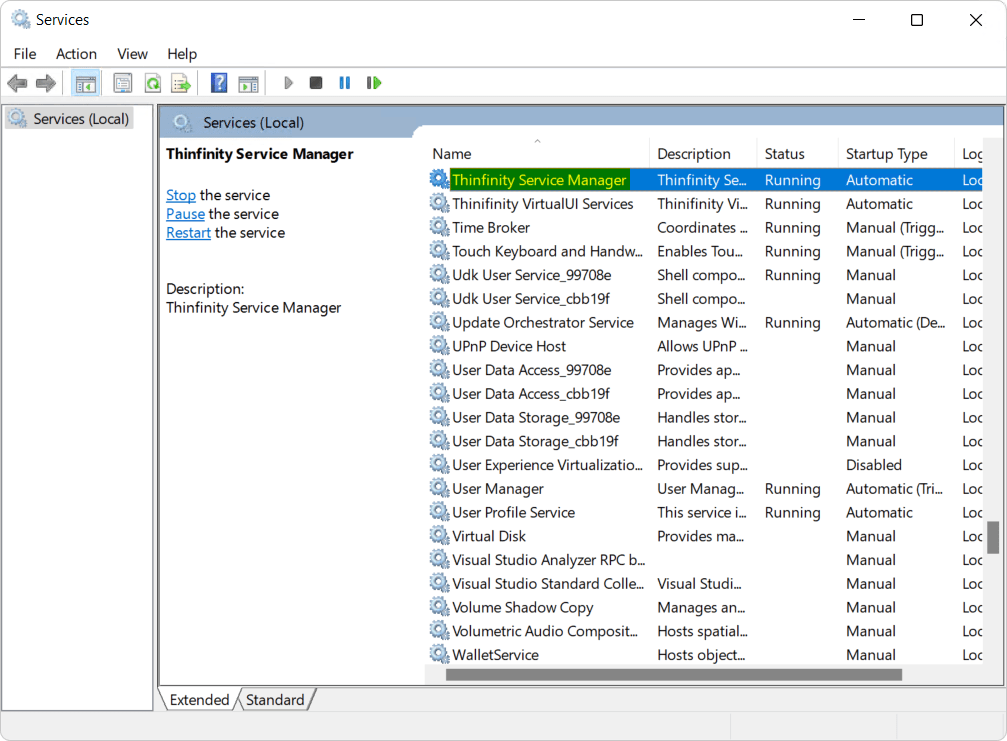
To ensure these changes are applied, you can go to ‘Start > Run > services.msc’ and restart the ‘Thinfinity Service Manager’:


publish premiere pro on web 10

Enabling high-quality performance

H264 is the most commonly used format for recording, compression, and distribution of high-quality resolution content in an efficient manner. As such, Thinfinity Remote Workspace must work in conjunction with H264 in order to provide a professional experience. To activate H264 for Thinfinity, check this step-by-step article.

Did you find this post useful? Let us know in the comments!

The post Publish AutoCAD to the web with Thinfinity Remote Workspace appeared first on Cybele Software, Inc..


Thinfinity Remote Workspace – Deliver all apps, desktops and files

$
0
0
Thinfinity Remote Workspace, deliver all apps, desktops, and files from anywhere on any device.

Thinfinity Remote Workspace is an integral solution to provide remote access to all applications, desktops, and files. This secure digital workspace platform is ideal for IT leaders who need a cost-efficient and scalable solution to share resources with their users, regardless of their location or device.

Weeks ago, Cybele Software introduced Thinfinity Remote Workspace, an out-of-the-box solution that allows admins to provide users with a seamless, unified experience across multiple devices while keeping administration simple too.


With this all-in-one solution you can provide access to:

Web VPN

Intranet web apps
and portals (Web VPN)

Supports 3rd party apps icon

Windows applications,
desktops, and terminals

Windows apps icon

RDP/VNC Windows,
Linux, and Mac desktops

File system virtualization icon

Remote files
and web folders

Thinfinity Remote Workspace is the best solution to build a flexible infrastructure—mix browser access to VDI, VMs, RemoteApps, and Unix machines. Build a private or hybrid infrastructure that runs seamlessly on a public cloud provider.


Simple application delivery

Thinfinity Remote Workspace is the ideal solution for application delivery. Provide access to Windows, Web, and terminal applications all from a unified website. Thinfinity Remote Workspace expands on the promise of simple application delivery by integrating a Web VPN, which allows you to remotely access ANY web application accessible only through an enterprise intranet.

Make the most of existing investments extending the life of your desktop apps by transforming them into a web solution. Host it on-prem, in the cloud, or as a hybrid environment.

Identity Provider Integration

Use any leading identity provider, like Azure AD, AWS, and Okta. Deliver an SSO and MFA experience and customize your authentication method to your customers’ needs.

Secondary Broker

Secondary Brokers

Support hybrid cloud deployments and access a pool of resources. Ideal for multiple network access.

Remote Printer

Remote Printing

Route printing jobs from the WTS/RDS server to a local printer. Print using local printers or remote resources.

Bi-directional Audio icon

Bi-directional Audio

Seamlessly use your local audio input on a remote machine.

SSL VPN

Active Directory Integration

Integrate your existing Active Directory with the Thinfinity authentication system. Create access profiles and map them to existing windows users.

Load Balancer

Load Balancing

Ensure optimal resource allocation and maintain full functionality, even in the event of a component failure.

Rest API Icon

Rest API Integration

Call any profile-related feature from external implementations. Natively authenticate with multiple user systems such as SQL and Firebase.

Booking Setting Icon

Resource Booking Capabilities

Allow users to book a scheduled time to use the resources at their disposal.

A tailor-made solution for all budgets and deployments

If you need a simple cloud solution that fits small or midsize deployments, Thinfinity Remote Workspace offers an online version that allows you to deliver apps, desktops, terminals, and files in just a few easy steps. The simplest cloud solution for your digital workspace.

Thinfinity Remote Workspace is also ideal for midsize or big deployments. You can host it on existing on-premise servers or public cloud of your choice. An Integrated, secure, and scalable digital workspace solution at the lowest TCO in the market. Works seamlessly with existing infrastructure models and identity providers.

Lacking the necessary infrastructure? Avoid infrastructure costs and deployment headaches. We host and manage it for you. We offer a turnkey solution that includes the setup and management of cloud-based infrastructure, developer environments, and office productivity software. Provide a fully-fledged digital workspace with practically zero effort.


If you found this article interesting and want to know more about Thinfinity Remote Workspace contact us or you can schedule a 15 minute demo call with one of our Sales Engineers.

The post Thinfinity Remote Workspace – Deliver all apps, desktops and files appeared first on Cybele Software, Inc..

Thinfinity Remote Workspace – Strong scheduling capabilities for remote campus access

$
0
0
Strong scheduling capabilities for remote campus access

Thinfinity Remote Workspace‘s latest update includes a built-in resource booking feature. The simplest way to schedule online classes and events.

While it has undoubtedly proved challenging for businesses to implement and support hybrid and remote work strategies, supporting a remote learning environment for school systems and colleges is even more daunting. Some students may have some type of computing device already, on the other hand, institutions must be able to ensure equity of access so that each student is guaranteed the same digital experience regardless of demographic or income. Everyone agrees that every child must have equal opportunity in digital learning, achieving this may be one of our most significant educational challenges.

The Shortcoming of One-to-One Programs

Some schools have gone the route of one-to-one programs as an answer in which each student is assigned school-issued devices to each student. While this logical but costly approach may be possible for some school systems with ample budgets, it is often out of reach for many districts. For those schools that are considering this alternative, the challenges are many.

  • Schools must have the necessary IT teams to support device deployments of such scale.
  • Excess inventory must be on hand to substitute broken or lost student devices.
  • Future budgets must be allocated to support perpetual and expensive refresh cycles.
  • Technology administrators are responsible for what students do with their machines outside classroom learning times, creating possible liability concerns for the district.
  • Technology departments must provide web filtering solutions that accommodate remote devices.
  • Different levels of technology are appropriate for each grade level, so an elementary student doesn’t need the same amount of access as a high school student.

The challenge isn’t just for K12 systems, however. Colleges and universities must also ensure that all students have the same equitable desktop experience. Even if all college students have a device, how can any level of desktop or application conformity be achieved when students have such a varied array of device form factors and operating systems?

The simplest way to schedule remote classes and events

Schedule a resource for your virtual classroom with our booking tool

Students don’t need access to digital learning resources 24/7. They just need them during class time. Occasionally, they may need access to a specialized lab computer or application outside the classroom. With the new easy-to-use booking feature of Thinfinity Remote Workspace, faculty and students can book the device or software they need based on date, time, and recurrence. Teachers can book complete virtual classrooms for their lessons, and students can check for specialized computer availability from a built-in calendar view. Devices are only available during prescribed set times. Students are automatically disconnected once the session ends, making the computer available for the next booked session. This has several advantages:

  • You don’t need an assigned desktop for every student throughout the school, just one for every station in a virtual classroom session.
  • School technology leaders are no longer saddled with enforcing web filtering for students outside of classroom time.
  • Because desktops never leave the network perimeter, securing and managing them is greatly simplified.

A Safe and Secure Learning Environment

Online security is a big concern for parents, school administrators, and technology leaders alike. Parents don’t want their children exposed to inappropriate web content. At the same time, desktop admins are responsible for securing student devices from multiple threat types when they leave the confines of the network perimeter. With Thinfinity Remote Workspace, the online student experience is tightly controlled because all resources are hosted in a secure cloud environment or within your on-prem protected environment. You can also create security policies that enforce where users can save data and restrict their ability to copy, paste or print to ensure the integrity of testing and student assignments.

Conclusion

At Cybele Software, we are making it easier for schools to focus on their task of educating students by reducing the burden of financing and supporting technology. Our out-of-the-box solution is the simplest cloud solution available for educational organizations. Those schools with an established on-prem infrastructure can already host Thinfinity on their existing on-prem environment. You can also let us manage and host everything for you, thus providing a fully-fledged digital classroom with practically zero effort. By shouldering the heavy lifting for you, your organization can focus on the art of teaching.


Find out more about how Thinfinity Remote Workspace is helping to empower schools to educate students wherever they may be. Contact us! We are happy to demo the product or answer any questions.

The post Thinfinity Remote Workspace – Strong scheduling capabilities for remote campus access appeared first on Sitio development - Cybele Software, Inc..

Bidirectional Audio Redirection on Thinfinity® Remote Workspaces

$
0
0
How to enable Bidirectional Audio Redirection on Thinfinity Remote Workspace

Thinfinity Remote Workspace delivers on its promise of taking locally installed applications to the web with crisp and clear HD video streaming. In the past years, the importance of good audio quality has become as essential as video. Today’s applications demand optimum audio performance with virtually no delay, no lag, and no compromises.

With this premise in mind, Thinfinity Remote Workspace includes audio and microphone input redirection from your remote application to your local computer. This feature is a remarkable addition for audio-dependent applications such as VoIP and Softphone software. For managed devices, it provides a solid alternative for Teams and Zoom audio calls.

Setting up Bidirectional Audio Redirection in Thinfinity Remote Workspace is extremely simple. You just need to configure it at a profile level.
To enable remote sound redirection, perform the following steps:

  • Firstly, open the Group Policy Editor by going to Start > Run > gpedit
  • Go to “Computer Configuration/Administrative Templates/Windows Components/Remote Desktop Services/Remote Desktop Session Host\Device and Resource Redirection”
  • There you’ll find the option “Allow audio and video playback redirection”


Allow audio and video playback redirection - How to enable Bidirectional Audio Redirection


  • Double click on it and check the Enabled option, then hit Apply and OK on the next window:


Enabled audio and video playback redirection - How to enable Bidirectional Audio Redirection


  • Open a Command Prompt window as an administrator and type “gpupdate /force” to apply the policy changes:


Command Prompt - How to enable Bidirectional Audio Redirection


  • You are now able to open the Thinfinity Remote Desktop landing page and edit a connection, by clicking on the pencil icon at the top-right of the access profile icon:


Edit a connection on Thinfinity Remote Workspace landing page - How to enable Bidirectional Audio Redirection

  • On the Web Profile Manager, go to the Resources tab where you can check the “Enable Remote Sound” option:


Enable Remote Sound - How to enable Bidirectional Audio Redirection


  • Please note that you should have permissions for both sound and microphone, enabled on your browser for the audio redirection feature to work:


Permissions for sound and microphone - How to enable Bidirectional Audio Redirection


If you found this article interesting and want to know more about Thinfinity Remote Workspace you can write to us or schedule a 15-minute demo call with one of our Sales Engineers.

The post Bidirectional Audio Redirection on Thinfinity® Remote Workspaces appeared first on Cybele Software, Inc..

How to customize your Thinfinity Remote Workspace login page using Web Aliases

$
0
0
How to customize your Thinfinity Remote Workspace login page using Web Aliases
Did you know that Thinfinity Remote Workspace has an easy way to customize the logo and web styling characteristics? Now you can give access to all your apps, desktops, and files using your brand style.

You can accomplish this by either replacing the image files in the directory “C:\Program Files\Thinfinity\Workspace\web\images” or editing the source file in the ‘index.html’. However, the most convenient way of customizing the whole experience is to use web aliases.

Web Aliases allow you to leave the original files unaltered. This is very useful when updating Thinfinity Remote Workspace to a newer version. Otherwise, after a software update, all modified files will be replaced by the default ones losing all your customizations.

Customize company logo & fav icon – Web Aliases Method

First, create a new folder structure for your custom images under C:\Program Files\Thinfinity\Workspace\web\. We will use the newly created folder named “Customization” for this example. Locate and transfer all your customized files under this directory.

Next, create a new file named “WebAliases.ini” in “C:\Program Files\Thinfinity\Workspace\bin64”.

On this file, you will create the mappings for the customized images that will replace the default ones. The structure for your INI setting should be set as follows:

[Alias]

originalfile=replacementPath


The paths in the “WebAliases.ini” file are relative to the webroot (“C:\Program Files\Thinfinity\Workspace\web”). Where originalFile is the relative path to any web file, and replacementPath is the absolute path to the new file.

For example, if you want to change the logo, which is originally located in C:\Program Files\Thinfinity\Workspace\web\images\idx, your INI setup should look like this:


[Alias]

/images/idx/productlogo.svg = C:\Program Files\Thinfinity\Workspace\web\customization\New_logo.svg


For your Favicon, you must create the web aliases to replace the original file located under C:\Program Files\Thinfinity\Workspace\web\. Follow the example below:


[Alias]

/favicon.ico = C:\Program Files\Thinfinity\Workspace\web\customization\New_favicon.ico


For your reference, you can find a complete example for all the customizations available through Web Aliases in your newly created INI file:

Styles customization

Updating the styles will require some basic CSS knowledge. Make a backup copy of all files before applying new changes.

CSS files can be located under: “C:\Program Files\Thinfinity\Workspace\web\css

Open the file you would like to work with and make any changes as required. Once you are done, simply save the changes, and you should be good to go.

Note: If you don’t have any CSS knowledge, we recommend asking your Web Designer for assistance on how to modify existing CSS setups properly.

How to customize your remote access login page
How to customize your Thinfinity Remote Workspace login page using web aliases

Did you know that Thinfinity Remote Workspace has an easy way to customize the logo and web styling characteristics? Now you can give access to all your apps, desktops, and files using your brand style. 

You can accomplish this by either replacing the image files in the directory “C:\Program Files\Thinfinity\Workspace\web\images” or editing the source file in the ‘index.html’. However, the most convenient way of customizing the whole experience is to use web aliases.

Web Aliases allow you to leave the original files unaltered. This is very useful when updating Thinfinity Remote Workspace to a newer version. Otherwise, after a software update, all modified files will be replaced by the default ones losing all your customizations.

Customize company logo & fav icon – Web Aliases Method

First, create a new folder structure for your custom images under C:\Program Files\Thinfinity\Workspace\web\. We will use the newly created folder named “Customization” for this example. Locate and transfer all your customized files under this directory.

Next, create a new file named “WebAliases.ini” in “C:\Program Files\Thinfinity\Workspace\bin64”.

On this file, you will create the mappings for the customized images that will replace the default ones. The structure for your INI setting should be set as follows: [Alias]
originalfile=replacementPath

The paths in the “WebAliases.ini” file are relative to the webroot (“C:\Program Files\Thinfinity\Workspace\web”). Where originalFile is the relative path to any web file, and replacementPath is the absolute path to the new file.


For example, if you want to change the logo, which is originally located in C:\Program Files\Thinfinity\Workspace\web\images\idx, your INI setup should look like this: [Alias]
/images/idx/productlogo.svg = C:\Program Files\Thinfinity\Workspace\web
\customization\New_logo.svg

For your Favicon, you must create the web aliases to replace the original file located under C:\Program Files\Thinfinity\Workspace\web\. Follow the example below: [Alias]
/favicon.ico = C:\Program Files\Thinfinity\Workspace\web
\customization\New_favicon.ico

For your reference, you can find a complete example for all the customizations available through Web Aliases in your newly created INI file:

Styles customization

Updating the styles will require some basic CSS knowledge. Make a backup copy of all files before applying new changes.

CSS files can be located under: “C:\Program Files\Thinfinity\Workspace\web\css”

Open the file you would like to work with and make any changes as required. Once you are done, simply save the changes, and you should be good to go.

Note: If you don’t have any CSS knowledge, we recommend asking your Web Designer for assistance on how to modify existing CSS setups properly.

How to customize your remote access login page

If you found this article interesting and want to know more about Thinfinity Remote Workspace you can write to us or schedule a 15-minute demo call with one of our Sales Engineers.

If you found this article interesting and want to know more about Thinfinity Remote Workspace you can write to us or schedule a 15-minute demo call with one of our Sales Engineers.

The post How to customize your Thinfinity Remote Workspace login page using Web Aliases appeared first on Cybele Software, Inc..

Publish QuickBooks to the web with Thinfinity Remote Workspace

$
0
0
How to publish QuickBooks to the web with Thinfinity Remote Workspace

QuickBooks® is one of the most used accounting applications by small and medium-sized businesses. However, businesses struggle to provide a reliable and cost effective solution for remote access to the desktop version. Learn how you can solve this by publishing QuickBooks with Thinfinity® Remote Workspace.

QuickBooks is a software widely used by SMEs or SMBs to manage income and expenses and keep track of the financial health of their business. Although there is an online version of QuickBooks, it does not have as many functionalities or features as the desktop version. For businesses with complex job-costing requirements, the online version is not an option; thus, webifying the fully featured Desktop edition becomes necessary.

As complex as it seems, this challenge can be easily solved by publishing a RemoteApp with Thinfinity Remote Workspace, our all-in-one solution for application and desktop delivery. To comply with QuickBooks requirements, Thinfinity Remote Workspace includes seamless support for remote printing, barcode and scanner, file transfer, and directory sharing to provide the best remote experience with no compromises.

*QuickBooks is a registered trademark of Intuit Inc.

What is a RemoteApp?

RemoteApp is a feature that allows individual programs to run remotely using a Remote Desktop Client. Instead of accessing the entire remote desktop, RemoteApp allows users to see and interact with just the application as if they were running on the end user’s device.

You don’t need to have any programming skills or make any modifications to the Windows application source code to accomplish it.

How to publish a RemoteApp with Thinfinity Remote Workspace?

Thinfinity Remote Workspace is the first integrated solution to access applications, desktops, and data, from a unified portal. You can enable remote access to all your apps, desktops, and files on any device.

Installing it for the first time is pretty simple. There are just a few items you have to take into account. You can check the Thinfinity Remote Workspace’s installation steps here.

Once you complete the installation process, log in to Thinfinity. Go to the index page and click “New” to get started. 

Thinfinity Remote Workspace Index - QuickBooks to the Web

First, you’ll need to select the type of connection you want to create. To create a Remote App profile, select “Application” and click “Next”.

Now select the “RemoteApp” option and click Next. 

RemoteApp option -Thinfinity Remote Workspace

If you are looking to deliver QuickBooks to your localhost, select ‘This PC’. However, if your QuickBooks app is located on a different device, select ‘Another PC’. In this sample, we’ll be selecting ‘This PC’.

Set-up Connection - Thinfinity Remote Workspace

Now specify the program path and filename. For QuickBooks Enterprise, it should look something like this:

“C:\Program Files\Intuit\QuickBooks Enterprise Solutions 22.0\QBWEntepriseWholesale.exe”

QuickBooks to the Web - Thinfinity

Next up, you’ll be prompted to select the type of authentication mode you want to use for this connection. In this case, we are going to select “Use Credentials” and create a username and  password.  

QuickBooks to the Web - Thinfinity

Now, specify the profile name and icon for your Remote App and hit ‘Done’:

Profile name for QuickBooks

Finally, click on ‘Commit’ to finish setting up your RemoteApp connection:

Thinfinity Remote Workspace - QuickBooks to the Web 2

You can now use QuickBooks on a browser via Thinfinity Remote Workspace!

Thinfinity Remote Workspace - QuickBooks to the Web 3Thinfinity Remote Workspace - QuickBooks to the Web 4

If you found this article interesting and want to know more about Thinfinity Remote Workspace, you can contact us or schedule a 15-minute demo call with one of our Sales Engineers.


The post Publish QuickBooks to the web with Thinfinity Remote Workspace appeared first on Sitio development - Cybele Software, Inc..

Why is Application Delivery crucial for today’s businesses?

$
0
0
Why is Application Delivery crucial for today’s businesses?

In today’s digital world, modern application delivery lies at the heart of every IT and development team. It allows them to deliver applications more quickly and efficiently, with total control over monitoring, maintenance, and continuous improvement, retaining a competitive edge.

What is Application Delivery?Application Delivery Network Concept Graphic

Application Delivery refers to the process of pooling the various services that can be combined to deliver an application to end-users, wherein the application’s data processing and computing take place over the cloud environment or within a data center.

App delivery promises an enhanced user experience for remote workers, as it offers application functionality without requiring it to be installed on the local system or desktop servers. The process enables remote and in-office workers to access web applications needed to be productive in their work.

Application Delivery Controller or the ADC is the most crucial element of Application Delivery. ADC, a computer network device within a data center, is essentially positioned between the organization’s web servers and the end user’s system to manage network traffic. ADC is part of a more significant Application Delivery Network or ADN, which refers to services deployed via a network to offer higher availability, visibility, and secure delivery for web applications.

Benefits of App Delivery

A cloud-native app delivery system offers multiple benefits for every organization, including higher agility, scalability, better security, centralization of management, optimized costs, and independence from devices.

Enhances Productivity

A recent study evidenced a substantial productivity boost in groups of people working from home. To help support this trend, Application Delivery enables remote employees to access data and services without time and distance constraints. Remote app delivery improves the overall productivity and efficiency of every employee.

Enriches End-User Experiences

An efficient cloud-based software delivery system will prompt the IT infrastructure and improve the end-user experience, offering a smooth run through all processes. Consequently, it has become the go-to choice for all customers.

Minimizes Costs

A cloud-native desktop delivery infrastructure prevents the organization from investing heavily in hardware acquisition and maintenance. Moreover, companies do not require an elaborate customer support team when the end-user experiences are strategically enhanced while you deliver your app.

Streamlines Infrastructure

Enterprise Application Delivery replaces hardware-based systems with slick cloud-native services that are agile and well-equipped to scale globally without compromising the quality and efficiency of end-user services.


Challenges of Application Delivery

Alongside the benefits come a few challenges in implementing the Application Delivery system. They are:

  • It becomes troublesome to provide a consistent and enhancing user experience across an increasing number of devices that connect with the cloud-native app delivery network.
  • In the case where permission-based access is lacking, connecting multiple cellular devices to a single ADC poses security challenges for the entire network.
  • It is crucial for the application delivery mechanism to balance the server load effectively, thereby ensuring the high availability of applications and employees’ productivity.
  • App Delivery requires organizations to install app virtualization servers, which are complex to install and configure. Application Virtualization is a comparatively novel concept yet to be adopted by technologically slow-footed organizations.


Why Choose Thinfinity Remote Workspace for App Delivery?

Thinfinity Remote Workspace products are designed to support application delivery systems that require agility, elasticity, and automation. Its comprehensive remote application delivery systems, enable organizations to deliver an enhanced end-user experience by reinforcing consistency across all devices, remote or in-house. 

Our remote app delivery solutions offer efficient load balancing capabilities, ensuring high availability, fault tolerance, and a consistent end-user experience across all connected devices. 

Above all, installing and configuring Thinfinity Remote Workspace solutions is relatively unambiguous. Therefore, with our assistance, organizations need to put little effort into achieving unified and centralized management of on-premise and multi-cloud infrastructures.


If you found this article interesting and want to know more about Thinfinity Remote Workspace, you can contact us or schedule a 15-minute demo call with one of our Sales Engineers.

The post Why is Application Delivery crucial for today’s businesses? appeared first on Cybele Software, Inc..

Third-Party Risk Management: Secure and time-limited remote access for contractors and vendors

$
0
0

Third-Party Risk Management: Secure and time-limited remote access for contractors and vendors

Temporary workers only need time-limited access. It seems obvious, yet only a few remote access solutions are designed to accommodate this fact. Thinfinity Remote Workspace, with its powerful booking solution, ensures that users not only receive access to the resources they need but also for the exact time frame they need them.

How does your business handle remote access for external contractors? That’s a question many are asking today as companies are relying more and more on contract workers, third-party vendors, and international staff augmentation strategies. 

Multiple reasons support this growing trend:

  • The prevalence of acute labor shortages in many countries that are restricting companies from hiring enough workers.
  • Vendors rely more on their dedicated installation teams to deploy complex product solutions as internal IT teams lack the necessary time or expertise.
  • Temporary increased labor capacities to fulfill sudden workloads spike or accelerate project timetables. 
  • Non-permanent employees are hired to bridge capacity until a permanent team is in place.
  • Contracting outside personnel with specialized skill sets for a specific project or time frame.

This increasing reliance on an external workforce presents a real challenge for businesses and organizations to allot remote access to resources they need and when they need them.

Temporary Work Means Temporary Access

Temporary workers only need temporary access. It seems obvious, yet only a few remote access solutions are designed to accommodate this fact. Organizations that still rely on legacy VPN solutions can relate to this hypothesis by gazing at their list of VPN-enabled user accounts. Some of these accounts used by outside vendors and contract workers are rarely active, while others are only utilized for limited time windows.

We can help on your transition to a digital workspace

Because these types of remote user accounts are seldom used, each represents a vulnerability. That’s because while full-time employees can police their accounts and know if they have been compromised, underutilized remote user accounts can be seized by external threat actors who can then use them unabated for extended periods.

Hardening Your Remote Access Attack Surface

We all know the importance of reducing the attack surface of servers. This is achieved by uninstalling unused applications, disabling unnecessary services, and closing open ports that aren’t required. The fact is that the attack surface of your remote access system needs to be hardened as well. Unfortunately, simply disabling these user accounts means more work for your IT team that must constantly enable and disable them according to the usage schedule. 

Fortunately, Thinfinity provides a simple solution that solves the inherent security challenge of granting remote access to contract workers, proving simple and effective.


Schedule Access for Contractors When They Need It

For years now, Thinfinity has been creating solutions to serve today’s needs for the hybrid workforce. Thinfinity Remote Access solutions have always been well suited for contract workers and other third-party users because they don’t require any particular client application, agent, or hardware. 

External users only need a simple web browser on any smartphone or internet-connected device to access the resources they need to perform their contracted work. 

Thinfinity has now taken this one step further by integrating Thinfinity Remote Workspace with a built-in scheduler app that lets you restrict resource availability to specified time slots. This means that external workers get scheduled access only when needed.


Let Contract Workers Book Their Time Slots

Perhaps you have a contracted specialist that performs tasks within your on-prem environment every weekend. Simply schedule an access window for them every weekend, set it up recurrently, and you’re done. 

Third parties that either perform a one-time job function or work a varying schedule can book a scheduled time themselves. Using a calendar view, they can choose the date and time that works for them, select from a list of available resources and edit or cancel existing bookings. Internal personnel can quickly scan a calendar to view the complete list of upcoming bookings. Once a remote session is ended, the access is revoked and is only made available if another session is scheduled once again. 


Integrates with Your Existing Environment

Thinfinity Remote Workspace is a turnkey solution that gives remote users a local-like experience that delivers business-critical apps and files from a single web portal.  It doesn’t require the installation of any dedicated hardware and integrates seamlessly with your existing identity provider of choice: 

  • Thinfinity Remote Workspace’s booking capabilities can be configured with existing AzureAD or legacy Active Directory and AWS or Okta. 
  • Conveniently add, remove and manage resource booking permissions by group instead of adding one user at a time. 
  • Increase security by integrating any existing SSO solution such as ask Duo, PingID, Auth0, Radius, or SAML (and many others).


Conclusion

ATemporary work aligns with temporary access, which is what Thinfinity Remote Workspace delivers with its powerful booking solution that ensures that users receive the level of access they need and only grant it for the exact time they need it. If you want just-in-time remote access for your remote users, contact us at Thinfinity for more information and a free trial to witness this empowering feature for yourself.

If you found this article interesting and want to know more about Thinfinity Remote Workspace, you can contact us or schedule a 15-minute demo call with one of our Sales Engineers.


The post Third-Party Risk Management: Secure and time-limited remote access for contractors and vendors appeared first on Cybele Software, Inc..


How to debug a custom authentication method made with C# using Visual Studio

$
0
0

How to debug a custom authentication method made with C# using Visual Studio

Authentication is key in the world of application delivery; however, some solutions fall short of providing support for advanced and custom integrations that greatly enhance a software security offering. Thinfinity VirtualUI allows developers to write custom authentication methods wrapped into a DLL. Here’s how to set up the debugging environment to test the health of a DLL written in C# with Visual Studio.

The standard ways to provide secure access to resources (including OAuth or any other Single Sing-On mechanism, with or without a second-factor authentication) are very efficient and reliable. But, in some situations, secure access is only a part of the solution.

The following list shows some scenarios where a solution like this can help us:

  • When you need better integration with other company systems.
  • When you have to integrate the sign-in into a complex authentication workflow.
  • If you want to save, use or track sign-in information in the workflow of a VirtualUI-powered application.

As a customizable integration solution, Thinfinity products lets you encapsulate the security schema or method within a DLL.

To explain this functionality, we provide the source code of a simple DLL. You can get the information to configure this authentication mechanism in the Product Guide to integrate it with Thinfinity VirtualUI

In this tutorial, you’ll learn how to debug the External DLL example in C# using Visual Studio.

1) Make sure you have the latest version of the Thinfinity Virtual UI demo.

2) Open the solution and change the ‘Any CPU’ option to ‘x64’


How to debug a custom authentication method made with C# from Visual Studio


3) Right-click on ExtAuth.IniFiles, click on ‘Build’


How to debug a custom authentication method made with C# from Visual Studio


4) Open the VirtualUI Server Manager, and navigate to the ‘Authentication’ tab. Click on ‘Add’ an ‘External DLL’


How to debug a custom authentication method made with C# from Visual Studio


5) Select the .dll that we just compiled, click on ‘Open’, then ‘OK’ and ‘Apply.


How to debug a custom authentication method made with C# from Visual Studio


6) The newly External method should be listed in the ‘Authentication’ methods list :


How to debug a custom authentication method made with C# from Visual Studio


7) Now, open Windows Task manager and stop Thinfinity Services. Close the Thinfinity Manager as well.
Finally, ensure that there are no leftover processes in the ‘Details’ tab.


How to debug a custom authentication method made with C# from Visual Studio


8) Go back to Visual Studio, right-click on ‘ExtAuth.IniFiles’, and select ‘Properties’


How to debug a custom authentication method made with C# from Visual Studio


9) Click on ‘Debug’, then ‘Start External Program’ and click ‘Browse’. Search for the Thinfinity.VirtualUI.Server.exe file located in C:\Program Files\Thinfinity\VirtualUI\bin64
In the ‘Command line arguments’ field, add the following line :
/start

Compare your settings with the screenshot below :


How to debug a custom authentication method made with C# from Visual Studio


10) Click ‘Start’ to start debugging the .dll


How to debug a custom authentication method made with C# from Visual Studio


11) Let’s add a breakpoint on line 52 to verify if the .dll is currently being debugged :


How to debug a custom authentication method made with C# from Visual Studio


12) Open your browser and navigate to your VirtualUI landing page. ( In my case https://localhost:6580 )


13) Log in using the ‘user1’ user and the ‘password’ password.


How to debug a custom authentication method made with C# from Visual Studio


14) If the breakpoint is reached, then we have successfully debugged the .dll!


How to debug a custom authentication method made with C# from Visual Studio


If you found this article interesting and want to know more about Thinfinity VirtualUI, you can contact us or schedule a 15-minute demo call with one of our Sales Engineers.

The post How to debug a custom authentication method made with C# using Visual Studio appeared first on Cybele Software, Inc..

Use Thinfinity’s load balancing capabilities to accurately manage server workload

$
0
0

Use Thinfinity’s load balancing capabilities to accurately manage server workload on mid-size and large deployments

Companies look to provide access to mission-critical applications effectively and efficiently. For advanced infrastructure setups with a large number of concurrent users, the main challenge lies in delivering high availability and fault tolerance solutions that can keep up with the increased demand.

How does your business handle remote access for external contractors? That’s a question many are asking today as companies are relying more and more on contract workers, third-party vendors, and international staff augmentation strategies. 

Why use Load Balancing in Thinfinity Remote Workspace?

When one server cannot manage to keep up with the needed resources, Load Balancing comes into play. Too many concurrent connections to applications that handle a lot of graphics, sound, or other elements that require high availability, may cause an overload. 

Thinfinity Remote Workspace provides components allowing you to distribute the workload across multiple Windows sessions and servers. You can scale application availability in instances, user accesses, and failover scenarios. To achieve optimal resource utilization and avoid server overload.

Some of the benefits of load balancing are:

  • Avoid overload by distributing the connections among different servers
  • Minimize response time
  • Improve reliability and redundancy
  • Provide failover control

If you conclude that your environment would benefit from load balancing, Thinfinity Remote Workspace allows you to choose between two possible architectures. This decision is essential in hardware scheme planning and system configuration to work in a distributed way.


Scenario 1: One Gateway and multiple Broker Servers

In this simple scenario, a single Gateway distributes the connection load between several Broker Servers.


Scenario 1 One Gateway and multiple Broker Servers


Scenario 2*: Multiple Gateways and multiple Broker Servers

This second scheme comprises multiple Broker Servers, multiple Gateways, and the DNS Server, its domain name associated with all the available Gateways’ IPs.


Scenario 2 Multiple Gateways and multiple Broker Servers

*Note: this method requires a round-robin DNS configuration and is not exemplified in this tutorial. 


Configuring Load Balancing in Thinfinity Remote Workspace

You first need to install the gateway component on your ‘Gateway Server’, then your broker component on your ‘Broker Server’.

  • Gateway Server


Open the Thinfinity InstallShield Wizard, then click on ‘Next’:


Use Thinfinity Load Balancing - Step 9


Select ‘I accept the terms in the license agreement’ and click on ‘Next’:


Use Thinfinity Load Balancing - Step 18


Select ‘Reverse Gateway Only’ and click on ‘Next’:


Use Thinfinity Load Balancing - Step 1


Choose a ‘Destination Folder’ and click on ‘Next’:


Use Thinfinity Load Balancing - Step 7


Now that everything is set up, click on ‘Install’:


Use Thinfinity Load Balancing - Step 14


  • Broker Server


Open the Thinfinity InstallShield Wizard, then click on ‘Next’:


Use Thinfinity Load Balancing - Step 9


Select ‘I accept the terms in the license agreement’ and click on ‘Next’:


Use Thinfinity Load Balancing - Step 8


Select ‘Broker and HTML5 Services’ and click on ‘Next’:


Use Thinfinity Load Balancing - Step 7


Choose a ‘Destination Folder’ and click on ‘Next’:


Use Thinfinity Load Balancing - Step 7


Now that everything is set up, click on ‘Install’:


Use Thinfinity Load Balancing - Step 14


To guarantee that the Load Balancing environment performs appropriately, you should look for the following items:

  • The Network ID
  • IP Bindings (in the Gateway Manager)
  • The Gateway URL (in the Broker Server)

The Network ID

The ‘Network ID’ must be the same across all gateway(s) and broker(s).

You can modify the Network ID to any value since it doesn’t follow a specific format:


Use Thinfinity Load Balancing - Step 17


Use Thinfinity Load Balancing - Step 3

IP Bindings

In the General tab, you would need to configure the Port and Bindings for the user (browser client) to reach Thinfinity Remote Workspace. 

You can do so by selecting the default connection and clicking on ‘Edit’. 

For instance, the address ‘http://Server_IP:9443’ is based on the settings below:

Check the box ‘Enable external access in Windows Firewall’ as well.

Use Thinfinity Load Balancing - Step 16

The Gateway URL (in the Broker Server)

Now that the gateway is configured, add the gateway(s) URLs on the Broker Manager:


Use Thinfinity Load Balancing - Step 19


Configuring the License Server Manager

When installing Thinfinity Remote Workspace Server in a Load Balancing environment, you need to use our ‘License Server Manager’ to pool the licenses between the back-end broker servers. You can see how this is configured below:

Open the License Server Manager on the machine in which the gateway is installed.

On this screen, click ‘Add’, and a menu will open, where you would need to select ‘Thinfinity® Remote Workspace 6.0’:

Use Thinfinity Load Balancing - Step 15

Check the ‘Activate a Serial Number online’ option and press ‘Next’:


Use Thinfinity Load Balancing - Step 6


Here, complete the fields ‘E-Mail’ and ‘Serial’ and press ‘Next’:


Use Thinfinity Load Balancing - Step 2


After the registration is complete, hit ‘Finish’:

Use Thinfinity Load Balancing - Step 12

Configuring the License tab

On the ‘License’ tab, configure the email address and serial number registered on the License Server Manager.

On the Primary Field, write the licensing server URL, the URL of the app’s installed server, and add port 7443.

Example: https://Server_IP:7443.

Select the ‘Use licensing server’ box, click ‘Apply’, and restart the Thinfinity service.

Use Thinfinity Load Balancing - Step 13

Verifying the server connection to the gateway

To verify if the Broker Servers are connected to the Gateway Servers, you can check the log file by clicking on ‘Show Log’:


Use Thinfinity Load Balancing - Step 10

It should say something like:

Server started. Listening HTTP on port 8443.

Broker: Connecting to http://127.0.0.1:8443/

Broker: Registered on http://127.0.0.1:8443/

Web Server: Connecting to http://127.0.0.1:8443/

Web Server: Registered on http://127.0.0.1:8443/


There are a few things to take into account when using Load Balancing:


All the Broker Servers have to share the same profiles. To this end, you can copy the database file ‘profiles.bin’ and distribute it to all the servers. You’ll find this in the following path:


C:\ProgramData\Cybele Software\Thinfinity\Workspace\DB


If you use One-Time-URL, you’d need to share the ‘Root Path’ for Temporary Folders. This will also ensure the users have consistency with their intermediate disk (ThinDisk) when they access files from the file manager or upload/download files:


Use Thinfinity Load Balancing - Step 4


Remember that if you only install the broker service on a server, you must register the license using the License Server Manager.

If you found this article interesting and want to know more about Thinfinity Remote Workspace, you can contact us or schedule a 15-minute demo call with one of our Sales Engineers.


The post Use Thinfinity’s load balancing capabilities to accurately manage server workload appeared first on Cybele Software, Inc..

How to run an OpenEdge Application Inside the Web Browser

$
0
0

Transform your existing business-critical OpenEdge application into a centralized, highly-available, high-performant modern SaaS solution.

Client-server applications are expensive and tough to maintain. Working on an entirely new web application alternative becomes unfeasible if your time is limited or your resources are scarce. 

Save time and money by webifying your application with Thinfinity VirtualUI in a few easy steps. This tutorial will teach you how to integrate your existing Progress OpenEdge application with Thinfinity VirtualUI, our application virtualization solution that provides instant web access for proprietary software.

Integrate extensive applications, which include several .w/.p programs, by adding one line of code to the main program. Changes applied are inherited by all the programs included in your application’s source code. This simple change enables anywhere access to your application without testing or refactoring.

Keep in mind that VirtualUI manages to achieve this by retaining the exact same behavior as the application’s source code remains unmodified; thus, you can keep running it with the Client Networking application as you are used to. 

Learn how to integrate your proprietary OpenEdge application with Thinfinity VirtualUI with the steps listed below:


Progress OpenEdge Applications on Thinfinity VirtualUI

Note: This tutorial applies to OpenEdge applications versions 8,9,10,11,12, and up.

Demo applications

To simplify the demo application to show the integration of the VirtualUI libraries with OpenEdge 4GL, we develop it on C:\OpenEdge\VirtualUI\ using Developer Studio 12.2. VirtualUI_AppBuilder and VirtualUI_dotNET projects, and test.pdf file used on apps, which can be located in that folder:

OpenEdge Application to the Web - VirtualUI Folder

Both app demos provided show the same basic functionality:

  • Define the file dialog usage based on the two available modes: VirtualUI built-in (StdDialogs=false) or using system dialogs (StdDialogs=true).
  • Upload files from browser machine to Server. A Server directory can be used as destination; if empty, the application temp directory is used.
  • Event handling for OnUploadEnd. The rest of the VirtualUI events can be handled in the same way.
  • Download files from Server. In the demos, the user selects a file from a FileOpen dialog browsing the Server file system.
  • Preview a PDF file on the browser.


Using VirtualUI on OpenEdge

VirtualUI can be used on OpenEdge applications in two ways:

  1. Using a COM object.
  2. Using a .NET class library.


The Thinfinity VirtualUI .NET class library is a .NET wrapper that allows programmers to natively access its events and methods. Choose each integration method depending on the OpenEdge environment you are using.


Using a COM object

The project VirtualUI_AppBuilder is an AppBuilder application that uses this method.

The VirtualUI library provides ActiveX classes and interfaces registered on installation. The main class is VirtualUI.

VirtualUI handle is declared in wWin.w code:


  DEFINE VARIABLE VirtualUI AS COM-HANDLE NO-UNDO.


This is created and started on the StartVirtualUI function, called as follows:


  FUNCTION StartVirtualUI RETURNS LOGICAL:

    /* Create VirtualUI instance:*/

    CREATE “VirtualUI.VirtualUI” VirtualUI NO-ERROR.


    IF NOT ERROR-STATUS:ERROR THEN DO:

        /* Start VirtualUI: if installed*/

        VirtualUI:Start(30).


        /* Enable events:*/

        VirtualUI:ENABLE-EVENTS(“VirtualUI”).


        RETURN TRUE.

    END.

    ELSE

        RETURN FALSE.

  END.


Also, events are enabled. The parameter is the prefix for procedure handlers: in this case, it is “VirtualUI”, so the event handlers must be declared as “PROCEDURE VirtualUI.EVENTNAME”. The event handler for OnUploadEnd, fired when an upload is finished, is declared in the following form:


  PROCEDURE VirtualUI.OnUploadEnd:

    DEFINE INPUT PARAMETER fileName AS CHARACTER.

    MESSAGE “Uploaded file:” fileName VIEW-AS ALERT-BOX INFORMATION BUTTONS OK TITLE “UploadEnd”.

  END PROCEDURE.


Using a .NET class library

The project VirtualUI_dotNET is a GUI for .NET application that uses VirtualUI from a class library.

The class library Cybele.Thinfinity.VirtualUI.dll, built from Cybele.Thinfinity.VirtualUI.sln, exposes the VirtualUI SDK for C# (Thinfinity.VirtualUI.cs) provided in VirtualUI Development Environment installation.

Once the class library is added to the project, all classes and interfaces are on Cybele.Thinfinity namespace can be used on applications.


VirtualUI object is declared in the main form (Form1.cls):


  DEFINE PRIVATE VARIABLE m_VirtualUI AS CLASS Cybele.Thinfinity.VirtualUI NO-UNDO.


And created and started on StartVirtualUI() method, which is called from the form constructor:


  METHOD PRIVATE VOID StartVirtualUI():

      /* Create VirtualUI instance:*/

      m_VirtualUI = NEW Cybele.Thinfinity.VirtualUI().


      /* Start VirtualUI:*/

      m_VirtualUI:Start(30).


      /* Attach event handlers:*/

      m_VirtualUI:OnUploadEnd:Subscribe(THIS-OBJECT:VirtualUI_UploadEnd).

  END METHOD.


Also, the event handler for OnUploadEnd is attached. This is fired when an upload is finished.


  METHOD PRIVATE VOID VirtualUI_UploadEnd(INPUT sender AS System.Object, INPUT e AS Cybele.Thinfinity.UploadEndArgs ):

      MESSAGE “Uploaded file:” e:Filename VIEW-AS ALERT-BOX INFORMATION BUTTONS OK TITLE “UploadEnd”.

  END METHOD.


Running on Server

To run the demos on VirtualUI Server, create the application profiles with the following parameters (check paths):

VirtualUI_dotNET app:

  • Program path: C:\Progress\OpenEdge\bin\prowin.exe
  • Arguments: -p wWin.r -nosplash
  • Start in folder: C:\OpenEdge\VirtualUI\VirtualUI_dotNET


VirtualUI_AppBuilder app:

  • Program path: C:\Progress\OpenEdge\bin\prowin.exe
  • Arguments: -p RunForm1.r -nosplash
  • Start in folder: C:\OpenEdge\VirtualUI\VirtualUI_AppBuilder


On production machines, the parameter -rr must be added to the arguments. If you have developer licenses, this parameter is not supported, and the Procedure Editor is shown after the main application form closes (see https://knowledgebase.progress.com/articles/Article/P20788 for more information).


Running on dev mode

To run in dev mode, under Progress Developer Studio:

1. Start VirtualUI Development Server.

2. Access http://127.0.0.1:6080 on the web browser.

3. Uncomment the lines included in the demos source files:

/* To run in dev mode, under Progress Developer Studio, uncomment these lines:*//*VirtualUI:Enabled = TRUE.

  VirtualUI:DevMode = TRUE.

  VirtualUI:DevServer:Enabled = TRUE.*/

4. Run application from Progress Developer Studio. The application will run on a desktop and on a web browser.


Transform your existing business-critical OpenEdge application into a centralized, highly-available, high-performant modern SaaS solution.

Client-server applications are expensive and tough to maintain. Working on an entirely new web application alternative becomes unfeasible if your time is limited or your resources are scarce. 

Save time and money by webifying your application with Thinfinity VirtualUI in a few easy steps. This tutorial will teach you how to integrate your existing Progress OpenEdge application with Thinfinity VirtualUI, our application virtualization solution that provides instant web access for proprietary software.

Integrate extensive applications, which include several .w/.p programs, by adding one line of code to the main program. Changes applied are inherited by all the programs included in your application’s source code. This simple change enables anywhere access to your application without testing or refactoring.

Keep in mind that VirtualUI manages to achieve this by retaining the exact same behavior as the application’s source code remains unmodified; thus, you can keep running it with the Client Networking application as you are used to. 

Learn how to integrate your proprietary OpenEdge application with Thinfinity VirtualUI with the steps listed below:


Progress OpenEdge Applications on Thinfinity VirtualUI

Note: This tutorial applies to OpenEdge applications versions 8,9,10,11,12, and up.

Demo applications

To simplify the demo application to show the integration of the VirtualUI libraries with OpenEdge 4GL, we develop it on C:\OpenEdge\VirtualUI\ using Developer Studio 12.2. VirtualUI_AppBuilder and VirtualUI_dotNET projects, and test.pdf file used on apps, which can be located in that folder:

OpenEdge Application to the Web - VirtualUI Folder

Both app demos provided show the same basic functionality:

  • Define the file dialog usage based on the two available modes: VirtualUI built-in (StdDialogs=false) or using system dialogs (StdDialogs=true).
  • Upload files from browser machine to Server. A Server directory can be used as destination; if empty, the application temp directory is used.
  • Event handling for OnUploadEnd. The rest of the VirtualUI events can be handled in the same way.
  • Download files from Server. In the demos, the user selects a file from a FileOpen dialog browsing the Server file system.
  • Preview a PDF file on the browser.


Using VirtualUI on OpenEdge

VirtualUI can be used on OpenEdge applications in two ways:

  1. Using a COM object.
  2. Using a .NET class library.


The Thinfinity VirtualUI .NET class library is a .NET wrapper that allows programmers to natively access its events and methods. Choose each integration method depending on the OpenEdge environment you are using.


Using a COM object

The project VirtualUI_AppBuilder is an AppBuilder application that uses this method.

The VirtualUI library provides ActiveX classes and interfaces registered on installation. The main class is VirtualUI.

VirtualUI handle is declared in wWin.w code:

  DEFINE VARIABLE VirtualUI AS COM-HANDLE NO-UNDO.

This is created and started on the StartVirtualUI function, called as follows:

  FUNCTION StartVirtualUI RETURNS LOGICAL:

    /* Create VirtualUI instance:*/

    CREATE “VirtualUI.VirtualUI” VirtualUI NO-ERROR.


    IF NOT ERROR-STATUS:ERROR THEN DO:

        /* Start VirtualUI: if installed*/

        VirtualUI:Start(30).


        /* Enable events:*/

        VirtualUI:ENABLE-EVENTS(“VirtualUI”).


        RETURN TRUE.

    END.

    ELSE

        RETURN FALSE.

  END.


Also, events are enabled. The parameter is the prefix for procedure handlers: in this case, it is “VirtualUI”, so the event handlers must be declared as “PROCEDURE VirtualUI.EVENTNAME”. The event handler for OnUploadEnd, fired when an upload is finished, is declared in the following form:


  PROCEDURE VirtualUI.OnUploadEnd:

    DEFINE INPUT PARAMETER fileName AS CHARACTER.

    MESSAGE “Uploaded file:” fileName VIEW-AS ALERT-BOX INFORMATION BUTTONS OK TITLE “UploadEnd”.

  END PROCEDURE.


Using a .NET class library

The project VirtualUI_dotNET is a GUI for .NET application that uses VirtualUI from a class library.

The class library Cybele.Thinfinity.VirtualUI.dll, built from Cybele.Thinfinity.VirtualUI.sln, exposes the VirtualUI SDK for C# (Thinfinity.VirtualUI.cs) provided in VirtualUI Development Environment installation.

Once the class library is added to the project, all classes and interfaces are on Cybele.Thinfinity namespace can be used on applications.


VirtualUI object is declared in the main form (Form1.cls):


  DEFINE PRIVATE VARIABLE m_VirtualUI AS CLASS Cybele.Thinfinity.VirtualUI NO-UNDO.


And created and started on StartVirtualUI() method, which is called from the form constructor:


  METHOD PRIVATE VOID StartVirtualUI():

      /* Create VirtualUI instance:*/

      m_VirtualUI = NEW Cybele.Thinfinity.VirtualUI().


      /* Start VirtualUI:*/

      m_VirtualUI:Start(30).


      /* Attach event handlers:*/

      m_VirtualUI:OnUploadEnd:Subscribe(THIS-OBJECT:VirtualUI_UploadEnd).

  END METHOD.


Also, the event handler for OnUploadEnd is attached. This is fired when an upload is finished.


  METHOD PRIVATE VOID VirtualUI_UploadEnd(INPUT sender AS System.Object, INPUT e AS Cybele.Thinfinity.UploadEndArgs ):

      MESSAGE “Uploaded file:” e:Filename VIEW-AS ALERT-BOX INFORMATION BUTTONS OK TITLE “UploadEnd”.

  END METHOD.


Running on Server

To run the demos on VirtualUI Server, create the application profiles with the following parameters (check paths):

VirtualUI_dotNET app:

  • Program path: C:\Progress\OpenEdge\bin\prowin.exe
  • Arguments: -p wWin.r -nosplash
  • Start in folder: C:\OpenEdge\VirtualUI\VirtualUI_dotNET


VirtualUI_AppBuilder app:

  • Program path: C:\Progress\OpenEdge\bin\prowin.exe
  • Arguments: -p RunForm1.r -nosplash
  • Start in folder: C:\OpenEdge\VirtualUI\VirtualUI_AppBuilder


On production machines, the parameter -rr must be added to the arguments. If you have developer licenses, this parameter is not supported, and the Procedure Editor is shown after the main application form closes (see https://knowledgebase.progress.com/articles/Article/P20788 for more information).


Running on dev mode

To run in dev mode, under Progress Developer Studio:

1. Start VirtualUI Development Server.

2. Access http://127.0.0.1:6080 on the web browser.

3. Uncomment the lines included in the demos source files:

/* To run in dev mode, under Progress Developer Studio, uncomment these lines:*//*VirtualUI:Enabled = TRUE.

  VirtualUI:DevMode = TRUE.

  VirtualUI:DevServer:Enabled = TRUE.*/

4. Run application from Progress Developer Studio. The application will run on a desktop and on a web browser.


If you found this article interesting and want to know more about Thinfinity VirtualUI,
you can contact us or schedule a 15-minute demo call with one of our Sales Engineers.

The post How to run an OpenEdge Application Inside the Web Browser appeared first on Cybele Software, Inc..

One-Time URLs: The Importance of Disposable Access

$
0
0

Providing remote access to your internal resources can be a real challenge. If you must deliver an application to potential customers or your contractors need temporary access to corporate desktops, disposable connections can help you provide one-time secure remote access while avoiding complex configuration steps.

If you are responsible for delivering remote access to resources, you know that setting the environment up can turn into a nightmare. The risk increases when granting access to total strangers: unlike simple screen sharing, enabling unattended access to a remote desktop session requires a user definition or assignment.

Then, how can you prevent those users from attempting to reuse guest credentials? How can you provide the most secure and convenient alternative whenever they need access to those resources? How to successfully combine web and desktop worlds into a single, integrated environment? Well, this is when the importance of being discardable becomes a necessity.

One-Time-URL is how Thinfinity allows you to create a single use-and-discard web address. In a nutshell, you can set and configure the desired connection and generate a dynamic link you will provide to the user for one-time access to a desktop or application on your local network. This dynamic link can be created by admins with built-in credentials and predefined session duration.

How to integrate One-Time URL in Thinfinity Remote Workspace

1. First, you need to ask Thinfinity Remote Workspace to generate your URL. Call Thinfinity Remote Workspace server following this URL format:

http(s)://Thinfinity:Port/ws/oturl/get?<queryString>


2. The queryString should be built with all parameters listed below:

apikey= <apikey> &apiuser= <apiuser> &model= <model> &plen= <passlen> &expires= <expires>

Find in the table below a description for each parameter:

Parameter Description
apiKey The ApiKey is a secret value known only by Thinfinity® Remote Desktop Server and the corporate application. Find out more about it on the ApiKey topic.
apiuser Use this parameter to identify the user within Thinfinity® Remote Desktop Server. The value should be the user or email registered on your website. The users are seen in the Analytics Web Service.
model Send the profile key of the profile you want to connect to. The profile’s settings will work as a template for the One-Time-URL connection that will be established. You can modify these settings by adding more parameters to the One-time-URL.
plen The plen parameter carries the password length.
expires Through this parameter you can set an expiration(in minutes) for the URL. Expires = 60 means that the URL won’t work anymore after 60 minutes from the URL generation.


On the next topics, you can find out other parameters you can use to Configure the connection and Enable features.


3. If Thinfinity® Remote Desktop Server gets to authenticate with the parameters sent on the queryString, it will return a One-Time-URL that will allow you to establish an RDP connection with the remote desktop.

/oturl.html?key=w7NJNschBdJD9e6G6luWhOCalM$oFW7guqC6jE1IQah3AJm3&pass=BOWZB8FG


Concatenate the Thinfinity® Remote Desktop Server address to the generated URL, following this format below:

http(s)://ThinfinityRDP:Port/oturl.html?key=w7NJNschBdJD9e6G6luWhOCalM$oFW7guqC6jE1IQah3AJm3&pass=BOWZB8FG


This way, the URL will be ready to be used. You can redirect your application to the desktop connection through it or even send it to an external user by e-mail.


⚠️You will find an HTML/ajax example inside the application installation directory, under the ‘webrdp’ folder. The file is named oturltest.html and implements the features covered on this topic.


In conclusion, a One-Time URL offers a useful way to extend web-enhanced applications to new scenarios. We are convinced you will greatly benefit from this Thinfinity Remote Workspace feature.

If you found this article interesting and want to know more about Thinfinity VirtualUI,
you can contact us or schedule a 15-minute demo call with one of our Sales Engineers.

The post One-Time URLs: The Importance of Disposable Access appeared first on Cybele Software, Inc..

[VIDEO] How to set up your first Web VPN connection

$
0
0

Thinfinity Remote Workspace Online is a hybrid service that provides remote access to your enterprise systems from any web browser. This cost-effective solution allows you to deliver applications running in your network without the hassle of setting up your own private or public cloud infrastructure. Thinfinity Remote Workspace Online complies with the industry’s security standards, keeping your company’s resources safe at all times. 

Today, Web VPNs are critical to keeping your employees connected to the core company’s applications—and for the IT Security Department to ensure that only authorized users gain access to these business-critical resources. A Web VPN allows end-users to securely access resources on a corporate network from anywhere with no additional software. It can be configured to enable communications between authorized end-users and specific applications or services running inside a network perimeter. 

Web VPNs provide a secure way for your workforce, contractors, and customers worldwide to access sensitive information from virtually any computer or device, regardless of location.

To learn more about Thinfinity Remote Workspace Online, visit online.thinfinity.com and start your 15-day free trial!

New to Thinfinity Remote Workspace Online? The following video tutorial will help you how to get started and create your first Workspace connection profile:

For more advanced configurations related to Web VPN and its custom request headers configurations, head over to the Thinfinity Remote Workspace’s documentation

If you found this article interesting and want to know more about Thinfinity Remote Workspace,
you can contact us or schedule a 15-minute demo call with one of our Sales Engineers.

The post [VIDEO] How to set up your first Web VPN connection appeared first on Cybele Software, Inc..

Using Cloud VDI Automation to Streamline IT Operations

$
0
0

Cloud automation refers to the process of managing a cloud environment using pre-defined logic to avoid manual and repetitive tasks. It is critical to managing complex environments efficiently, especially in a multi-cloud scenario. The same applies to VDI cloud-hosted infrastructures, which can significantly benefit from automation when accessed remotely.

It addresses numerous cloud-related challenges, such as cost efficiency, one of the most quoted challenges of using public clouds. 40% of companies state cloud cost management as their primary challenge with public clouds, and  61% of organizations plan to optimize existing use of the cloud for cost savings.

If we consider cloud-based virtual workspace solutions – which are increasingly adopted with the soar in remote working – a dedicated VM used by a single user only needs to be live as long as the session is active. Rather than having a VM continuously available, which leads to cost inefficiencies or manually spinning it up and down every time a session starts and ends, cloud VDI automation should provision a VM as needed for a session and automatically spin it down once it is finished.

Cloud Automation Business Benefits

As with most other automation-based improvements, cloud automation lowers the amount of overhead, infrastructure management costs, and human error. Relinquishing tasks such as manually spinning up and down new cloud-based services enables the DevOps teams to focus on value-adding services such as scoping and developing new features.

These benefits enable automation-based businesses to scale up considerably using a robust baseline. It’s a critical aspect that helps organizations invest their resources into growth activities and also provides a ‘write once use many times’ framework to lower operational tasks.

“40% of companies state cloud cost management as their primary challenge with public clouds”

Cloud VDI Automation Technical Benefits

Cloud automation also poses numerous technical benefits in terms of security, resilience, and governance.

  • Security and resilience — automating sensitive tasks – such as processing personal identifiable data – lowers the number of human operators involved and reduces the number of points of failure. Security best practices can be baked into the automated workflows to enforce its principles across all your deployments.

  • Business Continuity — to ensure a high availability service and protect against disasters, cloud automation can be used to automatically scale out your infrastructure and avoid a single point of failure, resulting in a fault-tolerant and performant solution. Automating can leverage multiple environments, including single or multiple public clouds, on-premises systems, and private cloud deployments.

  • Better Governance — an automated workflow ensures consistency when processing and documenting events. Moreover, automated workflows offer better visibility as all actions are logged and available to relevant stakeholders.

“Cloud automation lowers the amount of overhead, infrastructure management costs, and human error”

Conclusion

Cloud automation is one of the core components of an efficient end-to-end cloud-based workspace solution. We are constantly developing our automation capabilities to deliver cost-efficient and scalable solutions. To learn more about VDI automation or how Thinfinity Remote Workspace can empower your cloud-based project, book a call with one of our specialists; they are always available to guide you and provide the best solution for your requirements.

Cloud automation refers to the process of managing a cloud environment using pre-defined logic to avoid manual and repetitive tasks. It is critical to managing complex environments efficiently, especially in a multi-cloud scenario. The same applies to VDI cloud-hosted infrastructures, which can significantly benefit from automation when accessed remotely.

It addresses numerous cloud-related challenges, such as cost efficiency, one of the most quoted challenges of using public clouds. 40% of companies state cloud cost management as their primary challenge with public clouds, and  61% of organizations plan to optimize existing use of the cloud for cost savings.

If we consider cloud-based virtual workspace solutions – which are increasingly adopted with the soar in remote working – a dedicated VM used by a single user only needs to be live as long as the session is active. Rather than having a VM continuously available, which leads to cost inefficiencies or manually spinning it up and down every time a session starts and ends, cloud VDI automation should provision a VM as needed for a session and automatically spin it down once it is finished.

Cloud Automation Business Benefits

As with most other automation-based improvements, cloud automation lowers the amount of overhead, infrastructure management costs, and human error. Relinquishing tasks such as manually spinning up and down new cloud-based services enables the DevOps teams to focus on value-adding services such as scoping and developing new features.

These benefits enable automation-based businesses to scale up considerably using a robust baseline. It’s a critical aspect that helps organizations invest their resources into growth activities and also provides a ‘write once use many times’ framework to lower operational tasks.

“40% of companies state cloud cost management as their primary challenge with public clouds”

Cloud VDI Automation Technical Benefits

Cloud automation also poses numerous technical benefits in terms of security, resilience, and governance.

  • Security and resilience — automating sensitive tasks – such as processing personal identifiable data – lowers the number of human operators involved and reduces the number of points of failure. Security best practices can be baked into the automated workflows to enforce its principles across all your deployments.

  • Business Continuity — to ensure a high availability service and protect against disasters, cloud automation can be used to automatically scale out your infrastructure and avoid a single point of failure, resulting in a fault-tolerant and performant solution. Automating can leverage multiple environments, including single or multiple public clouds, on-premises systems, and private cloud deployments.

  • Better Governance — an automated workflow ensures consistency when processing and documenting events. Moreover, automated workflows offer better visibility as all actions are logged and available to relevant stakeholders.

“Cloud automation lowers the amount of overhead, infrastructure management costs, and human error”

Conclusion

Cloud automation is one of the core components of an efficient end-to-end cloud-based workspace solution. We are constantly developing our automation capabilities to deliver cost-efficient and scalable solutions.

To learn more about VDI automation or how Thinfinity Remote Workspace can empower your cloud-based project, book a call with one of our specialists; they are always available to guide you and provide the best solution for your requirements.

The post Using Cloud VDI Automation to Streamline IT Operations appeared first on Development - Cybele Software, Inc..

Multi-monitor increases hybrid work productivity

$
0
0

People are gradually going back to their offices. However, flexible work arrangements are now the norm, and remote work remains part of everyone’s life. Employers need to support a variety of work arrangements and computing experiences. 

Today’s key recommendation from IT companies is to provide employees with two or more monitors instead of just one. Using dual monitors boosts productivity, improves focus and efficiency, and reduces distractions.

According to recent studies, using multiple monitors can increase productivity by up to 40%. Enabling users to interact with several applications simultaneously does much more than provide minor improvements in accessibility. Time-saving, efficiency-building features such as dragging and dropping files between windows give people more control over their work experience, and can drastically improve morale, satisfaction, and mood. As a result, the use of dual monitors has become a common practice.  

Multi-monitor for improved remote access 

The Multi-monitor feature must support a seamless transition between home and workplace environments by providing users with a remote access solution that replicates the setup they usually run at the office. Users can access business-critical resources from any location, and they can work with the same display configuration they are already familiar with.

Multi-monitor for support teams

The Multi-monitor feature is critical for IT technicians and support teams who connect remotely to troubleshoot and assist users when a support request is initiated. Often, using remote access software to diagnose and resolve a user’s problem is as effective as troubleshooting in person

“According to recent studies, using Multi-monitor can increase productivity by up to 40%.”

Multi-monitor for power users

Some companies do not have the budget to allocate more than one (or two) monitors for every employee, in every location. Power users can use Multi-monitor to overcome hardware limitations in the office or when working remotely. Clientless remote access solutions allow users to configure, straight from the browser, the number of monitors they work with when remotely accessing resources. Multi-monitor provides a cost-effective alternative to additional hardware, thereby improving the user’s overall experience wherever they work.  

 Multi-monitor for multitasking and improved productivity

Lately, the number of productivity apps used by small-and mid-sized businesses has increased substantially in the past few years. From finance and ERPs to project management, users constantly switch from one application to another during the day. Instead of logging in and out or flipping between opened windows or tabs, Multi-monitor allows users to be more productive and agile by providing a persistent, dual-monitor experience.

Conclusion

Working remotely has a fair amount of challenges, creating a need for balancing work with personal life. Two (or more) screens can help boost productivity and effectiveness by supporting multitasking. Multi-monitor makes multitasking easier.

Remote access solutions that provide multi-monitor support give users the flexibility to configure their optimal monitor configuration and seamlessly switch from one work environment to another with no additional configuration effort. 

Consider Multi-monitor as a deciding factor when comparing clientless remote access solutions.

To learn more about how Thinfinity Remote Workspace can help you boost productivity and user experience, book a call with one of our specialists. We are always available to guide you and provide the best solution based on your specific needs.

The post Multi-monitor increases hybrid work productivity appeared first on Development - Cybele Software, Inc..


New Release – Thinfinity Remote Workspace Version 6.5

$
0
0

Cybele Software releases a revolutionary update to its already powerful Thinfinity® Remote Workspace

FOR IMMEDIATE RELEASE

Wilmington, DE (November 9, 2022)—Cybele Software, Inc. is thrilled to announce a major upgrade of its Thinfinity Remote Workspace platform. The product is designed for large to small IT departments that want to provide their organizations with a simple, flexible, and secure means to remotely access resources such as enterprise applications, desktops, and files. And all this is done without the need for complicated VPN clients. This clientless approach is key to implementing a zero-trust security model by isolating your organization’s resources from end-user device vulnerabilities.

The updated Thinfinity Remote Workspace platform is not limited to providing an easy avenue for facilitating remote and hybrid working environments; other compelling use cases for this product include providing training or virtual classroom portals, third-party risk management, and even providing software trial as a service.

With this latest release, Cybele Software listened to the needs of the market and their customers to improve upon its already powerful product. The new release of Thinfinity Remote Workspace includes improvements that put it in the forefront of the industry. These include the VDI Manager, Resource Reservation module, and multi-monitor support.

The VDI Manager module allows for the efficient use of resources to reduce operating costs. This is achieved by automating VMs to turn on or off as needed to provide access to a resource. VMs no longer need to be always on, nor do they need to be brought up from the stop state or brought back down manually. Even the creation of VMs can be automated through the use of templates. This frees your staff from repetitive tasks and allows for better use of organizational resources.

The Resource Reservation module provides a means to manage virtual classrooms, training, and demos—allowing organizers to book resources for a specific time slot and frequency and for specific users. The Resource Reservation module also includes a UI to allow end users to easily schedule their own time slot for using one or more resources.

Multi-monitor support is now included in this newest release, allowing users to extend their desktops without the need to install any additional software on their devices. Many people are accustomed to using more than one monitor to perform their work tasks. So in today’s world, being able to provide your users with this important feature is becoming essential to both promote efficiency and meet their expectations.

“Companies are always looking to reduce costs, increase revenue, and have a greater ROI as well as improved security. This new release of our Thinfinity Remote Workspace platform will help them achieve those goals. We are introducing time-based access policies for an extra layer of security, a VDI Manager to automate VM tasks and multi-monitor support for greater productivity. We do all this while keeping simplicity, flexibility, and security in mind. That is why I believe we are leaders in the marketplace.”—says Gustavo Ricardi, Founder and CEO of Cybele Software.

Since organizational needs vary and the platform is so versatile, Cybele Software is always there to provide answers and solutions that meet each client’s requirements.

Now with version 6.5 of Thinfinity Remote Workspace you can reduce costs, improve security, and better manage organizational resources via the VDI Manager and Resource Reservation module. The addition of multi-monitor support can also increase productivity and client satisfaction. These improvements, as well the many features already included in the product, can be explored further by visiting Thinfinity Remote Workspace’s page. Or contact Cybele Software, Inc. to schedule a call with a specialist to discuss your needs

Cybele Software releases a revolutionary update to its already powerful Thinfinity® Remote Workspace

FOR IMMEDIATE RELEASE

Wilmington, DE (November 9, 2022)—Cybele Software, Inc. is thrilled to announce a major upgrade of its Thinfinity Remote Workspace platform. The product is designed for large to small IT departments that want to provide their organizations with a simple, flexible, and secure means to remotely access resources such as enterprise applications, desktops, and files. And all this is done without the need for complicated VPN clients. This clientless approach is key to implementing a zero-trust security model by isolating your organization’s resources from end-user device vulnerabilities.

The updated Thinfinity Remote Workspace platform is not limited to providing an easy avenue for facilitating remote and hybrid working environments; other compelling use cases for this product include providing training or virtual classroom portals, third-party risk management, and even providing software trial as a service.

With this latest release, Cybele Software listened to the needs of the market and their customers to improve upon its already powerful product. The new release of Thinfinity Remote Workspace includes improvements that put it in the forefront of the industry. These include the VDI Manager, Resource Reservation module, and multi-monitor support.

The VDI Manager module allows for the efficient use of resources to reduce operating costs. This is achieved by automating VMs to turn on or off as needed to provide access to a resource. VMs no longer need to be always on, nor do they need to be brought up from the stop state or brought back down manually. Even the creation of VMs can be automated through the use of templates. This frees your staff from repetitive tasks and allows for better use of organizational resources.

The Resource Reservation module provides a means to manage virtual classrooms, training, and demos—allowing organizers to book resources for a specific time slot and frequency and for specific users. The Resource Reservation module also includes a UI to allow end users to easily schedule their own time slot for using one or more resources.

Multi-monitor support is now included in this newest release, allowing users to extend their desktops without the need to install any additional software on their devices. Many people are accustomed to using more than one monitor to perform their work tasks. So in today’s world, being able to provide your users with this important feature is becoming essential to both promote efficiency and meet their expectations.

“Companies are always looking to reduce costs, increase revenue, and have a greater ROI as well as improved security. This new release of our Thinfinity Remote Workspace platform will help them achieve those goals. We are introducing time-based access policies for an extra layer of security, a VDI Manager to automate VM tasks, and multi-monitor support for greater productivity. We do all this while keeping simplicity, flexibility, and security in mind. That is why I believe we are leaders in the marketplace.”—says Gustavo Ricardi, Founder and CEO of Cybele Software.

Since organizational needs vary and the platform is so versatile, Cybele Software is always there to provide answers and solutions that meet each client’s requirements.

Now with version 6.5 of Thinfinity Remote Workspace, you can reduce costs, improve security, and better manage organizational resources via the VDI Manager and Resource Reservation module. The addition of multi-monitor support can also increase productivity and client satisfaction. These improvements, as well as the many features already included in the product, can be explored further by visiting Thinfinity Remote Workspace’s page. Or contact Cybele Software, Inc. to schedule a call with a specialist to discuss your needs

The post New Release – Thinfinity Remote Workspace Version 6.5 appeared first on Development - Cybele Software, Inc..

How to enable Multi-Monitor using Thinfinity Remote Workspace

$
0
0

As we have mentioned in previous articles, using multiple monitors can increase productivity by up to 40%. Enabling users to interact with several applications simultaneously does much more than provide minor improvements in accessibility. Time-saving, efficiency-building features such as dragging and dropping files between windows give people more control over their work experience and can drastically improve morale, satisfaction, and mood. As a result, the use of dual monitors has become a common practice. 

Keeping that in mind, Thinfinity Remote Workspace 6.5 includes a Multi-Monitor feature that allows users to access up to 16 virtual monitors per Remote Desktop session. This latest release will enable you to run multiple applications on locally attached monitors.

To activate the Multi-Monitor feature, you’ll need to enable the H264 protocol on the target Windows Desktop or RDS server. Next, navigate your Thinfinity Remote Workspace site and edit the corresponding RDP Profile by clicking on the little pencil icon.


How to enable Multi-Monitor - Edit Access Profile


Now, enable ‘H264’ in the ‘Experience’ tab:


How to enable Multi-Monitor - Enable H264


Proceed to check ‘Enable Multi-monitor’ in ‘Display’ tab:


How to enable Multi-Monitor - Enable Dual Monitor


Finally, you are ready to connect to the Windows Desktop and open additional displays in your connection.

In the menu bar at the top, you will find the option ‘Display Layout’:


How to enable Multi-Monitor - Enable Multidisplay


From here, you can choose what side you wish to extend your screen:


How to enable Multi-Monitor - Select to Add New Display


To learn more about how Thinfinity Remote Workspace can help boost productivity and end-user experience using the multi-monitor feature, book a call with one of our specialists. We are always available to guide you and provide the best solution based on your specific needs.  

The post How to enable Multi-Monitor using Thinfinity Remote Workspace appeared first on Cybele Software, Inc..

Getting started with the Resource Reservation Scheduler

$
0
0

For years, Thinfinity has been creating remote access solutions to serve today’s needs in a secure, simple, and flexible way. Thinfinity has taken one step further by integrating Thinfinity Remote Workspace with a built-in Resource Reservation Scheduler.

This article outlines the main steps involved in setting up the Resource Reservation module and related components from beginning to end.

Table of Content:

Note: To enable this feature, check you have access to the “Web Manager”.

Set up resources to enable reservation.

First edit the Access Profile by clicking on the “Edit” button:


Getting started with Resource Reservation - Access profile edit


Next, we select the Resource Reservation option. Click on the dropdown additional settings.


Getting started with Resource Reservation - Open the Resource Reservation pannel


Now, enable “Booked access only” and select the booking access we want to permit. Choose the type of booking we want to provide from three options (“Organizers,” “Attendees,” or both), and save the configuration.


Getting started with Resource Reservation - Select the type of booked access for your resource


After saving, click on “Commit” to finish. The Access Profile is ready to allow bookings from Organizers and/or Attendees.


Getting started with Resource Reservation - Click on Commit

How to reserve a resource as an organizer

To make a new booking of a resource, click on the calendar icon in the top right corner of the screen.

Getting started with Resource Reservation - Resource Reservation Module

Then we click on the “New Booking” button to create a new resource reservation:

Getting started with Resource Reservation - Start new booking


Next, we will get prompted to select between a single or a group reservation. In this example, we will be creating a group reservation.


Getting started with Resource Reservation - Group Reservation

Then, we select the resource we want to reserve:

Getting started with Resource Reservation - Available Resource


Now, we have to set the date and time frame. We can choose between a one-time or a recurring reservation. For example, we select the “Recurrent” option and assign a recurring date and a time frame. 


Getting started with Resource Reservation - Type of Reservation


After setting the date, we need to add attendees to our reservation. We type their usernames and click on the “+ Add” button to do so.

Getting started with Resource Reservation - Attendess lnvite


In the last step, we need to give a name to our reservation and click “Next


Getting started with Resource Reservation - Resource Reservation Details


We will get a confirmation message at the end of the process.


Getting started with Resource Reservation - Booked succesfully

The Resource Reservation panel shows the scheduled event booked.


Getting started with Resource Reservation - One time Resource Reservation Event

How to reserve resource as an attendee

To make a new booking of a resource as an attendee, first, we click on the calendar icon in the top right corner of the screen:


Getting started with Resource Reservation - Resource Reservation Module

Click on the “New Booking” button to create a new resource reservation:


Getting started with Resource Reservation - Start new booking


Next, we select the resource we need to book:


Getting started with Resource Reservation - Available Resource


After that, we choose the time frame:


Getting started with Resource Reservation - Set a date


For the last step, we will give a name to our reservation:


Getting started with Resource Reservation - Selected Remote Resource


We will get a confirmation message at the end of the process.


Getting started with Resource Reservation - Booked succesfully


The Resource Reservation scheduler shows the scheduled event booked.


Getting started with Resource Reservation - Booked event

Conclusion

With Thinfinity Remote Workspace‘s built-in Resource Reservation Scheduler, IT admins can provide their end-users with a scheduled resource access capability.

This feature is suitable for use cases such as corporate training, virtual classrooms, and remote learning.

Book a call today to learn more about how Thinfinity can help your organization. We are always available to guide you and provide the best solution based on your specific needs.

For years, Thinfinity has been creating remote access solutions to serve today’s needs in a secure, simple, and flexible way. Thinfinity has taken one step further by integrating Thinfinity Remote Workspace with a built-in Resource Reservation Scheduler.

This article outlines the main steps involved in setting up the Resource Reservation module and related components from beginning to end.

Table of Content:

Note: To enable this feature, check you have access to the “Web Manager”.

Set up resources to enable reservation

First edit the Access Profile by clicking on the “Edit” button:


Getting started with Resource Reservation - Access profile edit


Next, we select the Resource Reservation option. Click on the dropdown additional settings.


Getting started with Resource Reservation - Open the Resource Reservation pannel


Next, enable “Booked access only” and select the booking access we want to permit. Choose the type of booking we want to provide from three options (“Organizers,” “Attendees,” or both), and save the configuration.


Getting started with Resource Reservation - Select the type of booked access for your resource


After saving, click on “Commit” to finish. The Access Profile is ready to allow bookings from Organizers and/or Attendees.


Getting started with Resource Reservation - Click on Commit

How to reserve a resource as an organizer

To make a new booking of a resource, click on the calendar icon in the top right corner of the screen.

Getting started with Resource Reservation - Resource Reservation Module

Then we click on the “New Booking” button to create a new resource reservation:

Getting started with Resource Reservation - Start new booking


Next, we will get prompted to select between a single or a group reservation. In this example, we will be creating a group reservation.


Getting started with Resource Reservation - Group Reservation

Then, we select the resource we want to reserve:

Getting started with Resource Reservation - Available Resource


Now, we have to set the date and time frame. We can choose between a one-time or a recurring reservation. For example, we select the “Recurrent” option and assign a recurring date and a time frame. 


Getting started with Resource Reservation - Type of Reservation


After setting the date, we need to add attendees to our reservation. We type their usernames and click on the “+ Add” button to do so.

Getting started with Resource Reservation - Attendess lnvite


In the last step, we need to give a name to our reservation and click “Next


Getting started with Resource Reservation - Resource Reservation Details


We will get a confirmation message at the end of the process.


Getting started with Resource Reservation - Booked succesfully

The Resource Reservation Scheduler shows the scheduled event booked.


Getting started with Resource Reservation - One time Resource Reservation Event

How to reserve resource as an attendee

To make a new booking of a resource as an attendee, first, we click on the calendar icon in the top right corner of the screen:


Getting started with Resource Reservation - Resource Reservation Module

Click on the “New Booking” button to create a new resource reservation:


Getting started with Resource Reservation - Start new booking


Next, we select the resource we need to book:


Getting started with Resource Reservation - Available Resource


After that, we choose the time frame:


Getting started with Resource Reservation - Set a date


For the last step, we will give a name to our reservation:


Getting started with Resource Reservation - Selected Remote Resource


We will get a confirmation message at the end of the process.


Getting started with Resource Reservation - Booked succesfully


The Resource Reservation Scheduler shows the scheduled event booked.


Getting started with Resource Reservation - Booked event

Conclusion

With Thinfinity Remote Workspace‘s built-in Resource Reservation Scheduler, IT admins can provide their end-users with a scheduled resource access capability.

This feature is suitable for use cases such as corporate training, virtual classrooms, and remote learning.

Book a call today to learn more about how Thinfinity can help your organization. We are always available to guide you and provide the best solution based on your specific needs.

The post Getting started with the Resource Reservation Scheduler appeared first on dev - Cybele Software, Inc..

Native 2FA Experience – Thinfinity Remote Workspace

$
0
0

These are the One-Time passcode (HOTP/TOTP) platforms supported by Thinfinity Remote Workspace:

  • Google Authenticator
  • DUO Mobile
  • Microsoft Authenticator
  • Okta Verify

If you want to make the Second Factor Authentication compatible with Google Authenticator, check the “Google Authenticator Compatible” checkbox.

Otherwise, you can set your own values :

Native 2FA Experience - Thinfinity 2


You can also specify which authentication methods will use 2FA.


Native 2FA Experience - Thinfinity 1


Native 2FA Experience - Thinfinity 7


Click on ‘Apply’ after you finish configuring all available options.

Next time the user authenticates on the Thinfinity Login page , he will be prompted to scan a QR code for matching his user to a Second-step Code Generate App:

Native 2FA Experience - Thinfinity 3


After matching the user with the Second-step Code Generate App, enter the verification code and click on ‘Continue’.


Native 2FA Experience - Thinfinity 9


The next time the user authenticates, the QR code will be replaced by the following image:


Native 2FA Experience - Thinfinity 11


If the user lost access to its Second-step Code Generate App, and needs to be reseted, this can be done from the Server Manager.

Click on the ‘Reset 2FA key for user’ , search for the username, and click ‘OK’.


Native 2FA Experience - Thinfinity 4

Native 2FA Experience - Thinfinity 5


If the user needs help remembering his username, it can be verified by using the ‘I don’t have access to my authentication device’ button.

Native 2FA Experience - Thinfinity 10

To learn more about how Thinfinity Remote Workspace can empower your project, book a call with one of our specialists; they are always available to guide you and provide the best solution for your requirements.

Recent posts

The post Native 2FA Experience – Thinfinity Remote Workspace appeared first on Cybele Software, Inc..

How to Install your SSL Certificate on Thinfinity Remote Workspace

$
0
0

An SSL certificate is an effective way to secure a website against unauthorized data interception. At its simplest, an SSL Certificate is used to identify the website and encrypt all data flowing to and from the Certificate holder’s Website.

Thinfinity Remote Workspace supports PFX format for SSL certificates.

PEM certificates usually have extensions such as .crt, .cer, and .key.

They are Base64 encoded ASCII files and contain “—–BEGIN CERTIFICATE—–” and “—–END CERTIFICATE—–” statements.

You can use an SSL converter, like https://www.sslshopper.com/ssl-converter.html, to convert the certificate file (PEM format), private key and CA file (chain certificate) along with a passphrase into a single PFX type of certificate, and merge them into a single certificate using the commands provided by sslshopper.

If you already use OpenSSL you can use this command to change any certificate in the format .pem to .pfx on cour command console :

openssl pkcs12 -export -out certificate.pfx -inkey privateKey.key -in certificate.crt -certfile CACert.crt

Here are the steps to create the certificate:

  1. Open the Thinfinity Configuration Manager and if you have an HTTPS protocol already set up, double. Click on it, otherwise create one by clicking on “Add”.

How to Install your SSL Certificate on Thinfinity Remote Workspace - step 01

  1. Once the Binding window appears, click on “New”.

How to Install your SSL Certificate on Thinfinity Remote Workspace - step 02

  1. Here you have the following options: to create your own self-signed certificate, create a certificate request or import a certificate.

How to Install your SSL Certificate on Thinfinity Remote Workspace - step 03


CREATE A SELF-SIGNED SSL CERTIFICATE

  1. Click on ‘Create a self-signed certificate’ and the following window will display.

How to Install your SSL Certificate on Thinfinity Remote Workspace - step 04

  • Country Code: The two-letter country code of the International Organization for Standardization (ISO 3166)
  • State: Full unabbreviated name of the state or province your organization is located.
  • Locality: Full unabbreviated name of the city where your organization is located.
  • Organization: The name your company is legally registered under.
  • Organizational Unit: Use this field to differentiate between divisions within an organization.
  • Common Name: The domain name or URL you plan to use this certificate with.
  • E-Mail Address: Company email address.
  • Bits: We recommend using a 2048 length key.

IMPORTANT: Keep in mind that this certificate has not been issued by a known Certificate Authority (CA), hence the web browsers will warn you that they cannot verify its authority.

Since this is not a certificate issued by a known Certificate Authority, you will receive a warning when accessing the landing page, to avoid this, you can add it as a trusted certificate on the Certificate Store from Microsoft. This certificate would need to be installed on all devices that wish to connect.


CREATE A CERTIFICATE REQUEST

  1. After clicking on Create a certificate request, you’ll need to fill out the following form:

How to Install your SSL Certificate on Thinfinity Remote Workspace - step 05

  1. After finishing the certificate request procedure, two files will be created: “Request key” and “Private key”.
  • Request key: This information needs to be sent to the Certificate Authority (CA)
  • Private key: You should save this information, in case you need it in the future.
  1. Afterwards, you can get your certificate from GoDaddy, VeriSign, Thawte, GeoTrust, Let’s Encrypt or a similar provider.
  1. Once you acquire the certificate, you must import it into Thinfinity Remote Workspace (we recommend using the PFX format for your certificate).


IMPORT CERTIFICATE

  1. When you click on “Import certificate”, the Certificate Import Wizard will open. On it, click on “Next”.

How to Install your SSL Certificate on Thinfinity Remote Workspace - step 06

  1. Select the certificate to import and then press “Next”.

How to Install your SSL Certificate on Thinfinity Remote Workspace - step 07

  1. After this, select the option “Automatically select the certificate store based on the type of certificate”.

How to Install your SSL Certificate on Thinfinity Remote Workspace - step 08

  1. Check that the right selections are displayed and then, click on “Finish”.

How to Install your SSL Certificate on Thinfinity Remote Workspace - step 09

Now you are all set up! You have configured your SSL certificate.

If you have any questions regarding the SSL certificate management, you can leave a comment below or email us at support@cybelesoft.com.


Regards!

The post How to Install your SSL Certificate on Thinfinity Remote Workspace appeared first on Cybele Software, Inc..

Viewing all 101 articles
Browse latest View live